注意
前往末尾下載完整的範例程式碼。
繪製花式框#
以下範例示範如何繪製具有不同視覺屬性的框 (FancyBboxPatch)。
import inspect

import matplotlib.pyplot as plt

import matplotlib.patches as mpatch
from matplotlib.patches import FancyBboxPatch
import matplotlib.transforms as mtransforms
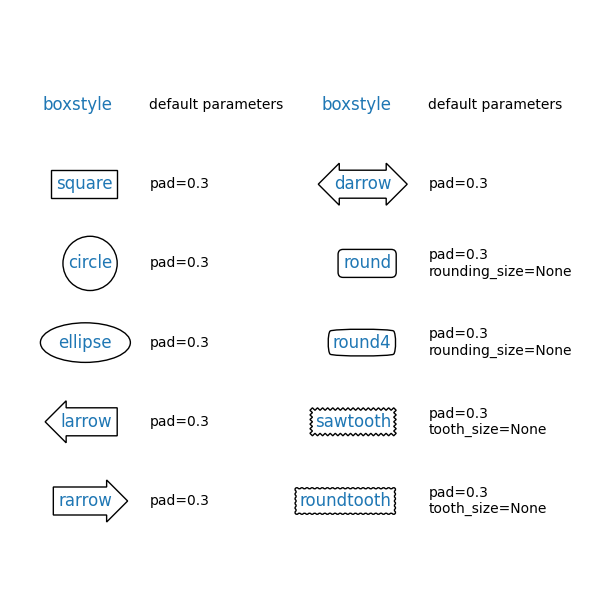
框樣式#
FancyBboxPatch 支援不同的 BoxStyle。 請注意,text 允許透過加入 bbox 參數在文字周圍繪製方塊。 因此,在以下範例中,您不會看到明確的 FancyBboxPatch 和 BoxStyle 呼叫。
styles = mpatch.BoxStyle.get_styles()
ncol = 2
nrow = (len(styles) + 1) // ncol
axs = (plt.figure(figsize=(3 * ncol, 1 + nrow))
       .add_gridspec(1 + nrow, ncol, wspace=.5).subplots())
for ax in axs.flat:
    ax.set_axis_off()
for ax in axs[0, :]:
    ax.text(.2, .5, "boxstyle",
            transform=ax.transAxes, size="large", color="tab:blue",
            horizontalalignment="right", verticalalignment="center")
    ax.text(.4, .5, "default parameters",
            transform=ax.transAxes,
            horizontalalignment="left", verticalalignment="center")
for ax, (stylename, stylecls) in zip(axs[1:, :].T.flat, styles.items()):
    ax.text(.2, .5, stylename, bbox=dict(boxstyle=stylename, fc="w", ec="k"),
            transform=ax.transAxes, size="large", color="tab:blue",
            horizontalalignment="right", verticalalignment="center")
    ax.text(.4, .5, str(inspect.signature(stylecls))[1:-1].replace(", ", "\n"),
            transform=ax.transAxes,
            horizontalalignment="left", verticalalignment="center")
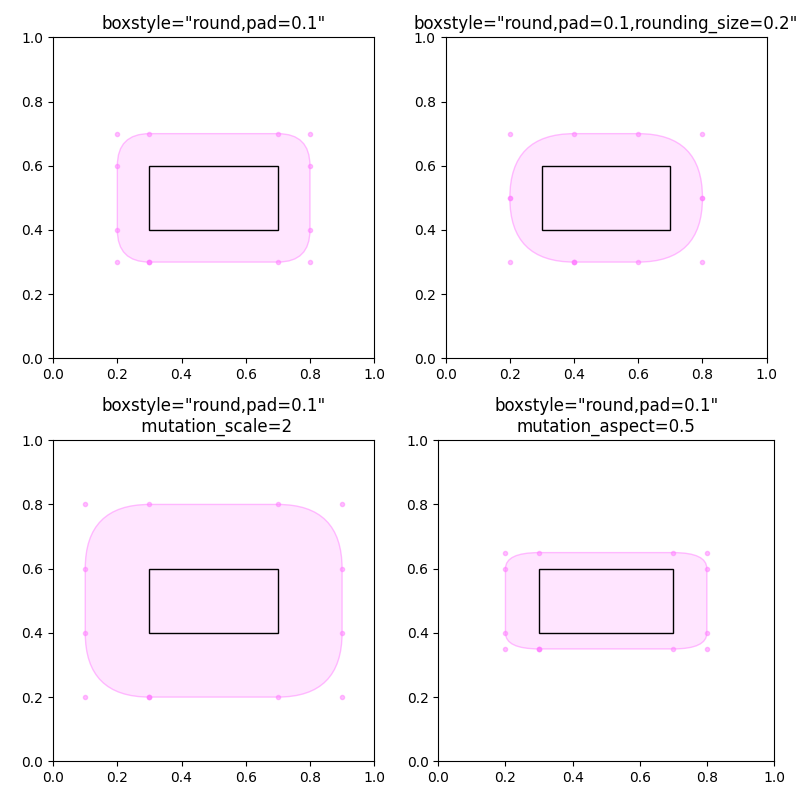
修改框的參數#
BoxStyle 具有用於配置其外觀的其他參數。例如,"round" 框可以有 pad 和 rounding。
此外,FancyBboxPatch 參數 mutation_scale 和 mutation_aspect 可以縮放框的外觀。
def add_fancy_patch_around(ax, bb, **kwargs):
    kwargs = {
        'facecolor': (1, 0.8, 1, 0.5),
        'edgecolor': (1, 0.5, 1, 0.5),
        **kwargs
    }
    fancy = FancyBboxPatch(bb.p0, bb.width, bb.height, **kwargs)
    ax.add_patch(fancy)
    return fancy


def draw_control_points_for_patches(ax):
    for patch in ax.patches:
        patch.axes.plot(*patch.get_path().vertices.T, ".",
                        c=patch.get_edgecolor())


fig, axs = plt.subplots(2, 2, figsize=(8, 8))

# Bbox object around which the fancy box will be drawn.
bb = mtransforms.Bbox([[0.3, 0.4], [0.7, 0.6]])

ax = axs[0, 0]
# a fancy box with round corners. pad=0.1
add_fancy_patch_around(ax, bb, boxstyle="round,pad=0.1")
ax.set(xlim=(0, 1), ylim=(0, 1), aspect=1,
       title='boxstyle="round,pad=0.1"')

ax = axs[0, 1]
# bbox=round has two optional arguments: pad and rounding_size.
# They can be set during the initialization.
fancy = add_fancy_patch_around(ax, bb, boxstyle="round,pad=0.1")
# The boxstyle and its argument can be later modified with set_boxstyle().
# Note that the old attributes are simply forgotten even if the boxstyle name
# is same.
fancy.set_boxstyle("round,pad=0.1,rounding_size=0.2")
# or: fancy.set_boxstyle("round", pad=0.1, rounding_size=0.2)
ax.set(xlim=(0, 1), ylim=(0, 1), aspect=1,
       title='boxstyle="round,pad=0.1,rounding_size=0.2"')

ax = axs[1, 0]
# mutation_scale determines the overall scale of the mutation, i.e. both pad
# and rounding_size is scaled according to this value.
add_fancy_patch_around(ax, bb, boxstyle="round,pad=0.1", mutation_scale=2)
ax.set(xlim=(0, 1), ylim=(0, 1), aspect=1,
       title='boxstyle="round,pad=0.1"\n mutation_scale=2')

ax = axs[1, 1]
# mutation_aspect scales the vertical influence of the parameters (technically,
# it scales the height of the box down by mutation_aspect, applies the box parameters
# and scales the result back up). In effect, the vertical pad is scaled to
# pad * mutation_aspect, e.g. mutation_aspect=0.5 halves the vertical pad.
add_fancy_patch_around(ax, bb, boxstyle="round,pad=0.1", mutation_aspect=0.5)
ax.set(xlim=(0, 1), ylim=(0, 1),
       title='boxstyle="round,pad=0.1"\nmutation_aspect=0.5')

for ax in axs.flat:
    draw_control_points_for_patches(ax)
    # Draw the original bbox (using boxstyle=square with pad=0).
    add_fancy_patch_around(ax, bb, boxstyle="square,pad=0",
                           edgecolor="black", facecolor="none", zorder=10)

fig.tight_layout()


plt.show()
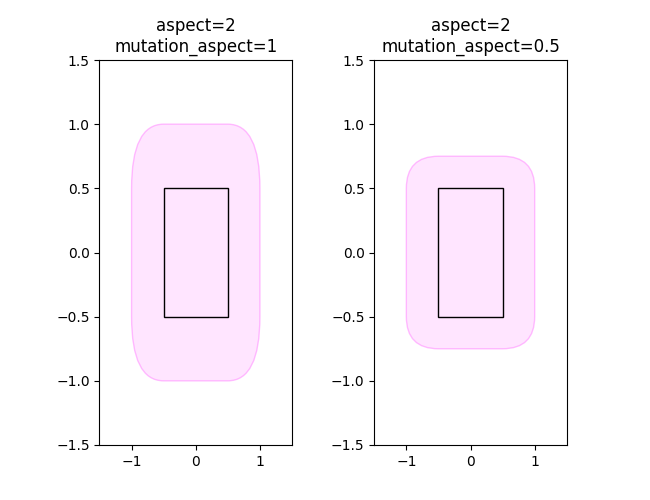
在非等縱橫比的座標軸上建立視覺上恆定的邊距#
由於邊距是以框座標表示,也就是通常的資料座標,如果座標軸縱橫比不為 1,則給定的邊距會呈現為不同的視覺大小。若要取得視覺上相等的垂直和水平邊距,請將 mutation_aspect 設定為座標軸縱橫比的倒數。這會適當地縮放垂直邊距。
fig, (ax1, ax2) = plt.subplots(1, 2, figsize=(6.5, 5))

# original boxes
bb = mtransforms.Bbox([[-0.5, -0.5], [0.5, 0.5]])
add_fancy_patch_around(ax1, bb, boxstyle="square,pad=0",
                       edgecolor="black", facecolor="none", zorder=10)
add_fancy_patch_around(ax2, bb, boxstyle="square,pad=0",
                       edgecolor="black", facecolor="none", zorder=10)
ax1.set(xlim=(-1.5, 1.5), ylim=(-1.5, 1.5), aspect=2)
ax2.set(xlim=(-1.5, 1.5), ylim=(-1.5, 1.5), aspect=2)


fancy = add_fancy_patch_around(
    ax1, bb, boxstyle="round,pad=0.5")
ax1.set_title("aspect=2\nmutation_aspect=1")

fancy = add_fancy_patch_around(
    ax2, bb, boxstyle="round,pad=0.5", mutation_aspect=0.5)
ax2.set_title("aspect=2\nmutation_aspect=0.5")
參考資料
此範例中顯示了下列函數、方法、類別和模組的使用方式
matplotlib.patches.BoxStyle.get_styles
腳本的總執行時間:(0 分鐘 2.753 秒)