注意
前往結尾以下載完整的範例程式碼。
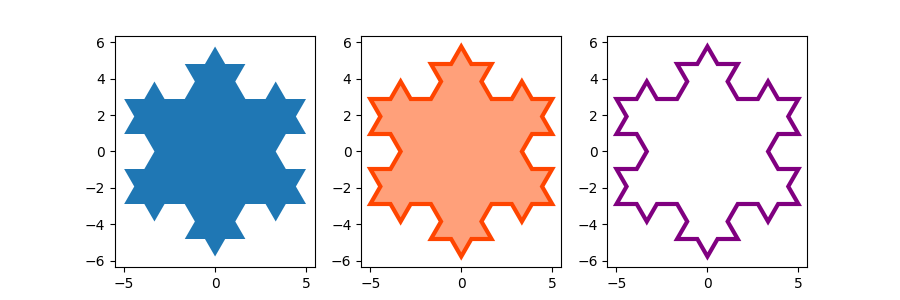
填充多邊形#
fill() 根據點座標 x、y 的列表繪製填充多邊形。
此範例使用 科赫雪花 作為範例多邊形。
import matplotlib.pyplot as plt
import numpy as np


def koch_snowflake(order, scale=10):
    """
    Return two lists x, y of point coordinates of the Koch snowflake.

    Parameters
    ----------
    order : int
        The recursion depth.
    scale : float
        The extent of the snowflake (edge length of the base triangle).
    """
    def _koch_snowflake_complex(order):
        if order == 0:
            # initial triangle
            angles = np.array([0, 120, 240]) + 90
            return scale / np.sqrt(3) * np.exp(np.deg2rad(angles) * 1j)
        else:
            ZR = 0.5 - 0.5j * np.sqrt(3) / 3

            p1 = _koch_snowflake_complex(order - 1)  # start points
            p2 = np.roll(p1, shift=-1)  # end points
            dp = p2 - p1  # connection vectors

            new_points = np.empty(len(p1) * 4, dtype=np.complex128)
            new_points[::4] = p1
            new_points[1::4] = p1 + dp / 3
            new_points[2::4] = p1 + dp * ZR
            new_points[3::4] = p1 + dp / 3 * 2
            return new_points

    points = _koch_snowflake_complex(order)
    x, y = points.real, points.imag
    return x, y
基本用法

使用關鍵字引數 facecolor 和 edgecolor 修改多邊形的顏色。由於邊緣的 linewidth 在預設 Matplotlib 樣式中為 0,因此我們也必須設定它才能使邊緣可見。
參考資料
此範例中顯示了以下函數、方法、類別和模組的用法
指令碼的總執行時間: (0 分鐘 2.467 秒)