注意
前往結尾以下載完整範例程式碼。
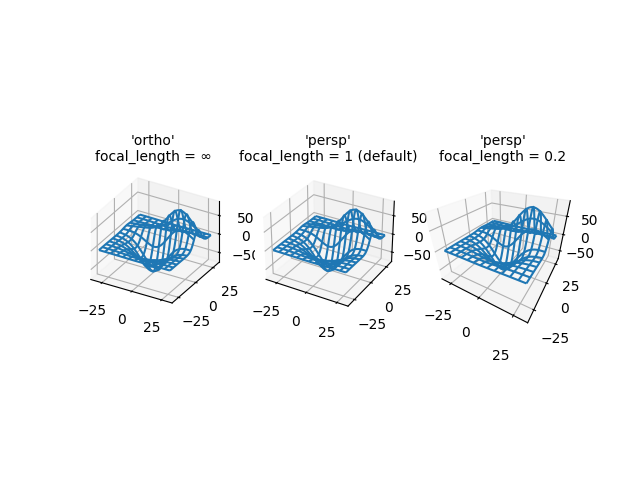
3D 圖表投影類型#
展示 3D 圖表的不同攝影機投影,以及變更透視投影焦距的效果。請注意,Matplotlib 會校正變更焦距的「縮放」效果。
預設焦距 1 對應於 90 度的視野 (FOV)。介於 1 和無限大之間的焦距增加會「扁平化」影像,而介於 1 和 0 之間的焦距減少則會誇大透視感,並使影像具有更明顯的深度。在極限情況下,校正縮放效果後,無限大的焦距對應於正交投影。
您可以使用以下方程式從 FOV 計算焦距
\[1 / \tan (\mathrm{FOV} / 2)\]
反之亦然
\[\mathrm{FOV} = 2 \arctan (1 / \mathrm{focal length})\]
import matplotlib.pyplot as plt

from mpl_toolkits.mplot3d import axes3d

fig, axs = plt.subplots(1, 3, subplot_kw={'projection': '3d'})

# Get the test data
X, Y, Z = axes3d.get_test_data(0.05)

# Plot the data
for ax in axs:
    ax.plot_wireframe(X, Y, Z, rstride=10, cstride=10)

# Set the orthographic projection.
axs[0].set_proj_type('ortho')  # FOV = 0 deg
axs[0].set_title("'ortho'\nfocal_length = ∞", fontsize=10)

# Set the perspective projections
axs[1].set_proj_type('persp')  # FOV = 90 deg
axs[1].set_title("'persp'\nfocal_length = 1 (default)", fontsize=10)

axs[2].set_proj_type('persp', focal_length=0.2)  # FOV = 157.4 deg
axs[2].set_title("'persp'\nfocal_length = 0.2", fontsize=10)

plt.show()
腳本總執行時間: (0 分鐘 1.232 秒)